
HOW THE BMP280 WORKS
The BMP280 comes in different types depending on where you buy it. Be aware because some are 5V devices and some are 3.3V devices. Also, some are SPI or I2C and some are not. This article will use the I2C 3.3V version. This one, although 3V, is 5V-compliant on the data pins. We are using an I2C version as the NRF24L01 is using the SPI bus.
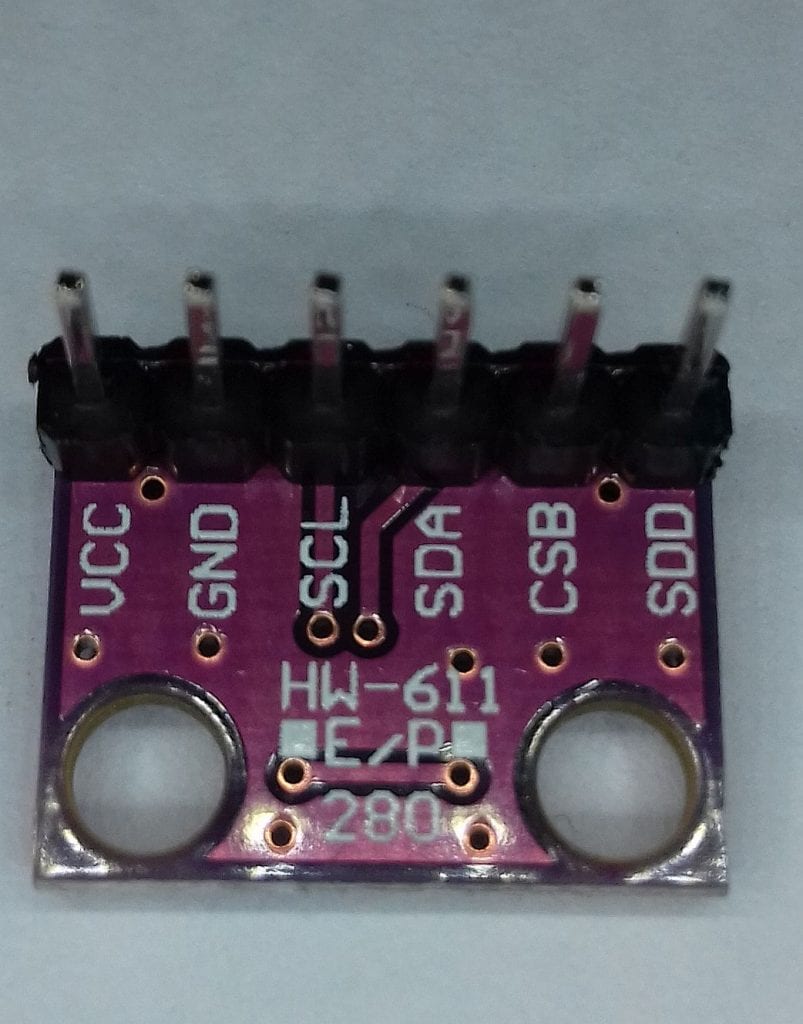
The pressure range is 300hPa to 1100hPa, which is about 10m below sea level to 9km high. Between 950hPa and 1050hPa, the altitude accuracy is +/-1m which is pretty awesome.
On some units, the I2C address is 0x77 and on others, it is 0x76. There is a useful address scanner in the Arduino playground here. If it does not find the address, check your wiring.
| BMP280 | Uno |
| VCC | 3.3V |
| GND | GND |
| SCL | A5 |
| SDA | A4 |
| CSB | Not used |
| SDD | Not used |
HOW THE NRF24L01 WORKS
The NRF24L01 is an SPI-connected digital transceiver, capable of transmitting and receiving data in the 2.4GHz ISM band (ISM stands for Industrial, Scientific & Medical). This is the same band used by Bluetooth and WiFi and does not require a license as it is low-power. It is a 3V powered unit, but the data lines are 5V compliant so no conversion is required. You can drive its VCC pin straight from the UNO’s 3.3V pin. The SPI interface runs up to 10mbps. Each module is operated on the same frequency or channel between 2.400 and 2.525 GHz. Within each channel, there are 6 ‘pipes’ allowing up to 6 links in each channel. This means one master could be listening to 6 slaves, all on the same channel but on different ‘pipes’.
| NRF24L01 | Uno |
| VCC | 3.3V |
| GND | GND |
| MOSI | 11 |
| MISO | 12 |
| SCK | 13 |
| CE | 9 |
| CSN | 8 |
| IRQ | Not used |
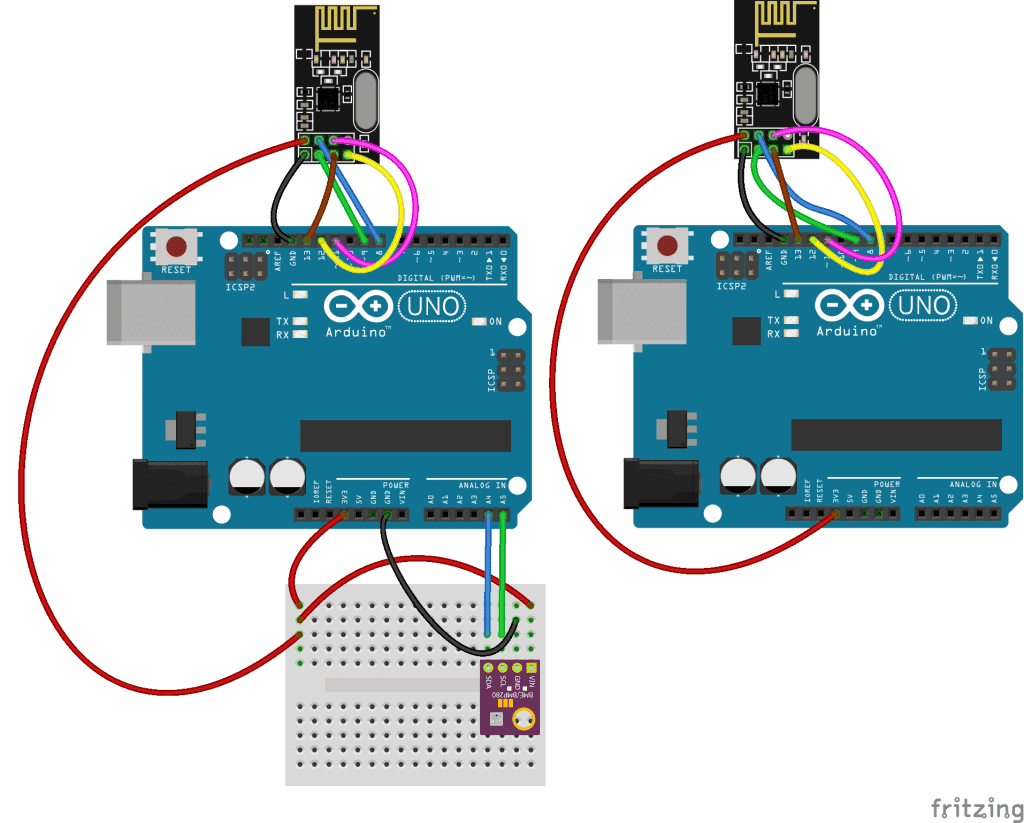
HOW TO CONNECT THE NRF24L01 TO THE ARDUINO
These are the parts you will need to build the example project below:
- 2 x Arduino Uno
- 2 x NRF24L01 transceiver module
- 1 x BMP280 barometric pressure sensor
- Breadboard
- Jumper wires
Once you have the parts, connect everything together following this wiring diagram:
INSTALLING THE LIBRARIES
There are a few libraries required:
- #include <SPI.h>
- #include <nRF24L01.h>
- #include <RF24.h>
- #include <Adafruit_BMP280.h>
- SPI.h is a standard library
- The BMP280 library can be found here
- Both NRF libraries can be found here
NOTES ON THE PROGRAM
- The
sizeof()function detects the length of the variable in bytes, i.e. an int is 2 bytes long, float 4 bytes etc. - You MUST have a matching data type on the receiving side because what the NRF24 actually sends is a series of bytes that is
sizeof()long. - If you try to stuff 2 bytes into 1 byte at the receiving end, you will get garbage.
- If you use an array, you can send several pieces of data in one message provided that the 32-byte limit is not exceeded. You can send any type of data i.e. char strings, integers or floats. Just be sure to have the receiver expecting to catch the same data type. In our example, because we want 3 decimal values, we use an array of 3 floats. The max length of a single message is 32 bytes. So 3 floats need 12 bytes, leaving plenty of headroom.
- All the pins except CE and CSN have to be wired as given. However, these two can be any convenient pins and declared as:
RF24 nrf(9, 8); // CE, CSN
ARDUINO CODE FOR THE MASTER
//nrf2401 transmitter:
#include <SPI.h>
#include <nRF24L01.h>
#include <RF24.h>
#include <Adafruit_BMP280.h>
RF24 nrf(9, 8);  // CE, CSN
Adafruit_BMP280 bmp;

const byte linkAddress[6] = "link1";
float QNH = 1022.67; //Change the "1022.67" to your current sea level barrometric pressure (https://www.wunderground.com)
const int BMP_address = 0x76;

float pressure;
float temperature;
float altimeter;
float data[3];
char charVal[17];
////////////////////////////////////////////////////
void setup()
{
  Serial.begin(9600);
  Serial.println("BMP280/NRF24L01 link");
  nrf.begin();
  bmp.begin(BMP_address);
  nrf.openWritingPipe(linkAddress);  //set the address
  //nrf.setPALevel(RF24_PA_LOW);   //keep tx level low to stop psu noise, can remove this but then put in decoupling caps
  // Options are: RF24_PA_MIN=-18dBm, RF24_PA_LOW=-12dBm,  RF24_PA_HIGH=0dBm.
  nrf.setPALevel(RF24_PA_HIGH);
  nrf.stopListening();  //act as a transmitter
}
///////////////////////////////////////////////////
void loop()
{
 pressure = bmp.readPressure()/100;  //and conv Pa to hPa
 temperature = bmp.readTemperature();
 altimeter = bmp.readAltitude (QNH); //QNH is local sea lev pressure

 data[0] = pressure;
 data[1] = temperature;
 data[2] = altimeter;
 //----- display on local monitor: ------------
 Serial.print(data[0]); Serial.print("hPa  ");
 Serial.print(data[1]);
 Serial.write(0xC2);  //send degree symbol
 Serial.write(0xB0);  //send degree symbol
 Serial.print("C   ");
 Serial.print(data[2]); Serial.println("m");
 //---------------------------------------------

  nrf.write(data, sizeof(data)); //spit out the data array

  delay(300);
}