How do you use a 3D printer step by step? Many different technologies share the same basic steps which we’ll cover next, but each 3D printer can also be easier or harder to use depending on its features.
Step 1 – Prepare your design for 3D printing
By this point, it’s important you have a part ready to print and you have chosen your material. This part can be one you designed yourself using CAD (computer aided design), one taken from a 3D scan, or one you have taken from an inventory of existing designs.
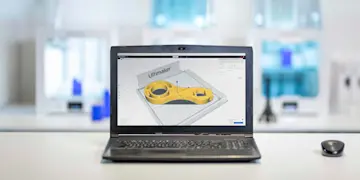
Before you start printing, you need to translate your design into ‘coordinates’ the 3D printer can understand, as well as tell it important parameters such as the material you are printing with.
This is known as ‘slicing’, because it involves slicing the 3D design into – you guessed it – layers. This is typically done in a program known as slicing or print preparation software. Our Ultimaker Cura slicing software comes with many preconfigured settings so will normally only take you a matter of seconds to prepare a print. Or if you prefer granular control of the printing process, there are also hundreds of custom settings to use. Once the slicing is done, your file is ready to print.

Step 2 – Set up your printer
You could also do this step first if you like. Or you may not need to at all, for example if you regularly print the same type of parts.
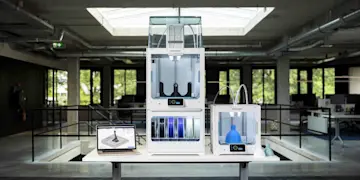
But before you start printing, be sure to check you have the right material loaded. FFF 3D printers like Ultimaker also let you choose different nozzle sizes, with a smaller nozzle giving more detailed prints and a larger nozzle faster print times. If you’re using Ultimaker software together with an Ultimaker 3D printer, it will check your printer configuration and prompt you if anything needs changing.
Step 3 – Send your file to the printer
Once you are ready to go, you need to get the file to your 3D printer. There are two main ways to do this. One is to load the file onto a data storage device (such as a USB drive), put it in the printer, and start your print job via the printer’s interface. The other option is to send the job remotely to a network enabled printer via your local network or the cloud. Remote printing is particularly helpful if you are not in the same location as your 3D printer.
Step 4 – 3D print
Now you can sit back and relax! Or if you’re at work, get on with something else while the printer does its job.
Printing times vary depending on the size and detail level of your printed object and your 3D printer type. On an FFF 3D printer such as Ultimaker, a small component or rough prototype may only take a few hours. Most parts will be ready the next day if you leave the printer running overnight. And if you need a very large, detailed print, you may have to wait a couple of days.
Some 3D printing platforms enable you to monitor your print job. You can do this via the Ultimaker Digital Factory – and with an Ultimaker S3 or Ultimaker S5 printer, even view progress via a webcam feed.
When the print is finished, remove from the printer. Depending on your chosen material and printing process, some final manual steps may be needed before it’s ready to use. With an FFF 3D printer, this ‘post-processing’ is often little more than peeling off a small brim of material around the part. Other methods like SLA or SLS typically need more intricate post-processing, for example removing the loose powder from the chamber of an SLS printer.

Are 3D printers easy to use?
This can depend on a lot of factors, but in general 3D printing is one of the most accessible manufacturing processes available. Compared to injection molding or CNC machining, 3D printers are a much easier way to make parts and models, which is why it works as a desktop technology everywhere from schools to offices.
But, there are a few things to be aware of that will help make your experience of 3D printing hassle-free:
-
Material choice – Perhaps the key area where all 3D printers are not created equal. Check which materials a 3D printer can print or you may end up surprised to discover you are limited to only one or two. Even worse, some printer manufacturers only let you print with their own material products, so you’re locked into using these forever. Look for a 3D printer that’s compatible with a wide range of materials, including those made by third parties, so you can leverage the near endless options on the market and benefit from open innovation
-
Automation – There are potentially hundreds of parameters and configurations involved every time you 3D print, such as printer temperatures or how the nozzle will travel to build up the print. But at Ultimaker, we don’t believe this should mean complexity for the user. For example, our material spools come with embedded NFC chips so the printer knows what’s loaded, preconfigured printing profiles in our software dramatically reduce setup time for each print, and you can manage the whole end-to-end process in one place via the Ultimaker Digital Factory
-
Support and service – If things do go wrong, it can be frustrating and impact your productivity. So be sure to check your 3D printer comes with comprehensive support and a warranty. Check for troubleshooting, FAQs, and other resources so you can easily solve problems yourself and stay productive
What do you need to 3D print?
Your 3D printer should come with everything you need to get started out of the box. Below we list the essentials, as well as the optional extras it’s good to know about:
-
A 3D printer – OK, this one’s obvious
-
Material – Your printer should include some in the box or it can be bought from 3D printing vendors
-
Software – Some printer brands supply their own, or you may have to find a compatible program. Note that there are two types of 3D printing software – print preparation (or slicing) software and printer (or print job) management software
-
Consumables – In addition to materials, your 3D printer may require or come with other consumables. For example, oil or grease for maintenance, or adhesive aids for the build surface. With Ultimaker, everything you need to get started comes in the box
-
Tools (largely optional) – Some 3D printers may require one or two basic tools for configuration changes or maintenance. (Again, with Ultimaker everything essential comes in the box.) Otherwise, if you’re going to be using your 3D printers a lot and will need to do some post-processing of prints, it’s useful to keep a few tools handy. We created a guide to tools for FFF 3D printers
-
Peripherals (optional) – These can add more functionality to your 3D printer. For example, for some of our printers you can also add an Air Manager, which encloses the 3D printer and filters up to 95% of UFPs (ultrafine particles), or Material Station which stores filament in an optimal environment and automatically loads material when a spool runs out
Next to this, all you need is a power supply and a clean, safe workspace for your 3D printer. You can find more advice on these topics in our free, in-depth white papers.
How do you use a 3D printer at home?
Hobbyists and entrepreneurs have been using desktop 3D printers at home for years, but at a time when remote working is more common than ever, this is an important question.
Generally, the same setup advice as above for a workplace is recommended. But think carefully about two key considerations – safety and space. SLS and SLA printers require careful processing of hazardous chemicals before unused resin or powder can be disposed of with your household waste. And as space is likely at a premium in the home, choosing a large format printer like the Ultimaker S5 Pro Bundle may not be practical compared to a smaller unit like an Ultimaker 2+ Connect or Ultimaker S3.

