
Lithium-ion batteries’ popularity is rising owing to their significant advantages over lead-acid batteries. However, a Li-ion charger circuit is different from that of the latter. Next, let’s discuss them.
Li-Ion Charging Basics

A Li-Ion Battery
You can charge a Li-Ion battery at a rate of 1C, equivalent to the battery’s Ah rating. But, there are a few considerations/ precautions to undertake when charging a Li-Ion Cell which is as follows:
- Your input supply must have a fixed/constant current and voltage output. Preferably, use a battery voltage 14% higher than the battery’s printed value and 50% of its Ah value.
- Also, ensure the lithium-ion battery charger features an auto-cut-off to stop charging on attaining the full charge level.
- Thirdly, the input current should be low enough not to cause battery heating.
Simplest Li-Ion Charger using a single MOSFET

Rechargeable lithium-ion battery with charger
Circuit Diagram
The circuit diagram below represents a simple Li-ion battery charger circuit.
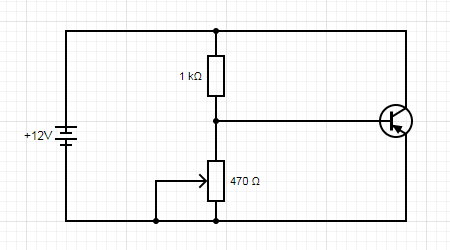
But, the above circuit lacks a temperature regulation feature. Hence, when charging, use a relatively low input current.
Setting up the circuit
This Lithium Ion Battery charger is a simplistic circuit that requires the following components:
- A trimmer/ Preset
- 470 ohm 1/4 watt resistor
- A MOSFET
How the Circuit Works
Above are some of the components you require to set up this circuit. Also, you need to maintain the following conditions:
- First, your power supply’s input current should remain significantly low to prevent heating damage to the Lithium-ion cell. It is handy in prolonging the battery life.
- Also, adjust the trimmer to have a constant voltage of 4.7V. You can realize this by connecting the following:
- A Zener diode instead of the preset
- A 1K resistor rather than a 470-ohm resistor to realize this.
- Thirdly, ensure your charging current is 0.5C or 50% of the battery’s mAh value. In addition, it would help if you added a BJT current control stage to manage the input source.
Besides, it’s important to ensure the battery’s temperature during charging to prevent damage. For this, it is advisable to use a relatively low input current.
Using LM317 as the Controller IC
Circuit Diagram
How to set up the circuit
Connect your circuit as shown in the above diagram
An LM317 IC is useful in controlling the Li-Ion cell’s maximum current and charge voltage. This protection is handy in Li-ion battery charging as these cells are prone to damage.
Also, a couple of NPN transistors are essential in detecting the battery power variations. For this, you should place them in a manner that they’re in direct contact with the rechargeable battery.
How the circuit works
Primarily, the LM317 IC controls the input power and generates an output voltage of 3.7V. Further, the following components control the respective features of the circuit.
- First, a 640-ohm resistor curtails charge voltage from exceeding the full charge limit.
- Also, two NPN transistors in the IC’s ADJ pin keep the lithium battery temperature under check.
- Thirdly, the transistors are significant as current limiters. They achieve this by eliminating the occurrence of an over current to the lithium Ion rechargeable battery.
Li-Ion Battery Charger Circuit Using IC 555
Circuit Diagram
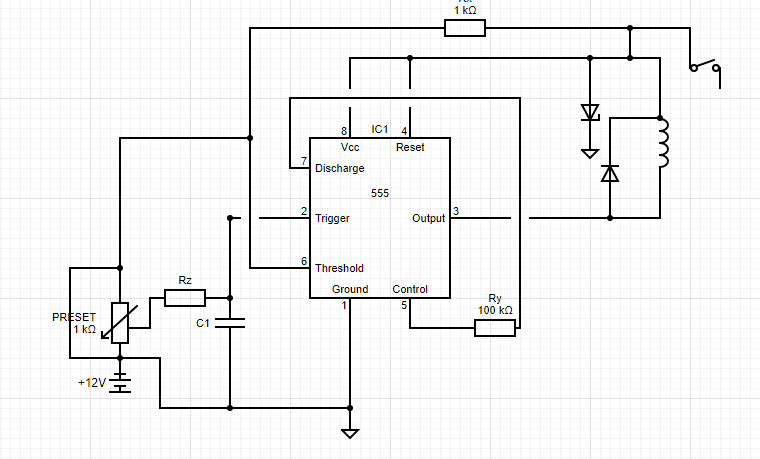
How to set up the circuit
Follow the circuit diagram above to set the circuit. Again, the fundamental role of the IC 555 is to control the current charging rate. It ensures you charge the Lithium battery within the safe levels.
The IC 555 operates as a comparator in this circuit with pins that detect the voltage threshold limits. However, detecting the lower and upper voltage levels primarily depends on the preset’s settings.
How it works
Primarily, the IC’s pins 2 and 6 are responsible for controlling the lower and upper voltage limits, respectively. Thus, connecting a discharged 3.7 V Lithium Ion Battery will prompt the IC’s pin 2 to detect the low voltage level and set it high. It initiates the charging process.
When the battery archives its threshold full charge capacity, Pin 6 will change the output to low. Thus, this will limit further charging. Note that your transformer’s voltage shouldn’t exceed 6V while its current rating should be about a quarter of the battery’s Ah.
TP4056 Based Lithium Ion Battery Charger Module

A TP4056 Lithium Ion Battery Charging Board
You’ll find two forms of the TP4056-based Li-ion charger breakout board in the markets. One has a battery protection circuitry, while the other lacks one. The kind offering protection has three modules responsible for the task. They include:
- A battery protection IC- DW01A
- A Dual N-Channel Enhancement Mode Power MOSFET IC
- TP4056 IC.
Hence, the kind with a protection feature has three ICs while the one without has only the TP4056 IC. Notable, the TP4056 is common to both types thanks to its key features that are as follows:
- Firstly, it guarantees constant current and constant voltage
- Also, it has an SOP package and a relatively low external component count. Hence, its best suited to DIY charging applications.
- Besides, it is compatible with USB supplies and wall adapters.
How it works
For best results in charging a 3.7 V Lithium-ion battery, apply a constant current of approximately 20 to 70 % of its capacity. You should do this until it reaches 4.2 V. Afterwards, charge the battery at a constant voltage until there is a 10% drop in the initial charge rate. The TP4056 is responsible for facilitating the above process.
Charging Many Li-Ion Batteries

Several Li-Ion batteries
It is important to be cautious when charging Li-ion batteries as they are subject to heating during charging. Still, lithium-ion batteries are easier to charge at higher rates than lead-acid batteries. It is thanks to their capability to be charged at a 1C rate.
Of cardinal importance when charging Li-Ion batteries is keeping the temperature at bay. Hence, a precise temperature sensor circuit is handy.
Conclusion
A Li-Ion charger circuit differs from a lead acid battery circuit yet is not sophisticated. We’ve covered all the essential insights of this circuit. For more on this, contact us.